The Best Ancient Egypt Activities for Kids

Hey, just so you know … This post includes affiliate links. That means if you use them to make a purchase, I may earn a commission. You can read my full affiliate disclosure HERE.
Do your kids moan and groan when they hear the words ‘social studies'? This was me during my school days – but not anymore, and this is one reason homeschooling is so great. There are many creative ways to make history come alive!
Homeschool mama, now's your chance to show how ancient civilizations, like the Ancient Egyptians, not only lived but how they thrived.
Below are some Ancient Egypt projects to get your children excited about one of the most amazing places on earth. I'll also share some fascinating facts that you can incorporate into your homeschool lesson plans.
For example, did you know King Tutankhamun became king at only nine years old? Or that Howard Carter only discovered King Tut's tomb in 1922 – that's a long time after he ruled Egypt. There were so many artifacts in his tomb that it took the team of archaeologists 10 years to document and remove everything!
In addition, the Ancient Egyptians were the ones who created toothpaste and paper – thank goodness for these very inventive and smart people!

We're going to go through some ideas for Ancient Egypt activities for kids, perfect to add to your own homeschool unit study or Ancient Egypt lesson plans to make learning fun. And I'll also share with you a techie resource to take your studies even further.
Beginning Your Study of Ancient Egypt
Before you get started though, let's use technology find out exactly where Egypt is.
Take your children on a virtual tour of Ancient Egypt through Google Earth. Google Earth is such a fun tool – it feels like a teleportation device, whipping you from one continent across to another.
Find the Nile, the longest river in Africa, and see how it runs through the country. In this desert area, the Nile was a source of life.
The Red Sea lies on the east coast and has some of the best dive sites in the world.
Showing your child this shows them that this is a real place. A place that they could possibly one day go and visit!
Ancient Egypt Activities for Kids
Next, let's jump right into some of my favorite hands-on activities that your kids can do as they learn about Ancient Egypt.
Make Your Own Pharaoh's Headband
The Ancient Egyptians used to were headbands all the time, and it wasn't just the kings. Many people wore headbands, or sometimes headcloths, as a form of decoration, to protect them from the sun, and to show power.
Depending on your child's age and creativity levels, a variety of headbands can be made.
The most common one and the easiest one to make is the Pharaoh's headband. For a younger child, I love this free template from Learn, Create, Love. Print it out and have them color it in, or paint it, with golds, blues, and emerald greens. You could also use gold spray paint in a well-ventilated area under adult supervision and glue on rhinestones or other sparkly objects.
If your child is a teen and studying ancient civilizations, they could get more technical in their headdress making and incorporate chains, semi-precious stones, and other embellishments, and create a headband that they would use if they were crowned Pharaoh in the day.
Make Mud Bricks
The most famous of all attractions in Egypt are the Great Pyramids. This activity is a fun challenge for young kids!
To this day, no one knows how the Great Pyramids were built, or how those massive stones were layered so perfectly on top of one another while creating chambers and tunnels running deep inside the pyramids.
There are many theories about how they were built, but no one knows for sure.
What we do know is how they made mud bricks for their houses or storage rooms. Making bricks was just a part of daily life. The Egyptians would take soil from the Nile River and mix it with small pieces of straw. Then they would take their handmade wooden molds and fill them with this mud, pressing it down so that it was compact.
Now your kids can do the same thing! (Except your wooden mold is going to be an ice cube tray.)
Make your mud at home with soil and water. The more fertile the soil is, the more compact your mud, or clay, will be.
Alternatively, make them from ingredients in your kitchen:
- Mix 2 – 3 cups of cornstarch with water to make a paste
- Add soil from your garden for a more gritty texture, or you can add cocoa powder to change the color, but the texture will remain smooth.
- Keep this thick
- Spray your ice cube tray with non-stick spray.
- Fill your tray with your Egyptian mud, compress it into the pan and leave it in the sun to bake. For easier removal, you can add a lollipop stick to easily pull them from the tray, and then cut the stick off so you're only left with the brick.
If your bricks are not perfectly shaped, don't stress about it. The bricks from Ancient Egypt were not perfect either, BUT they did the job!
Create Your Own Canopic Jar
What is a Canopic Jar?
Ancient history is always exciting as there were cultures and traditions of these people that still have a shock factor for people learning about them today.
When someone died, the Ancient Egyptians had an entire process devoted to handing the remains of the deceased as they had respect for them and wanted to help them move smoothly into the Afterlife.
The canopic jars kept some of the organs of the person, and this jar was then buried together with the mummified body. The Ancient Egyptians believed that the person would need these organs in their Afterlife. The only organ not put into the jar was the heart – that would remain with the body.
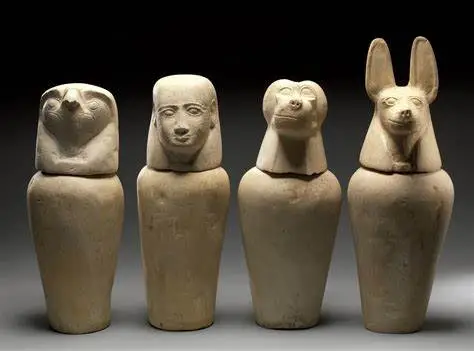
Depending on the wealth of the deceased, the canopic jars were made from clay, stone, wood, or gold. The tops were engraved with one of the Four sons of Horus (the guy with the hawk head), who they believed was one of the Ancient Egyptian gods of kingship and the sky. Each of the four Sons stored a different organ.
Here is how you can make your very own canopic jars at home:
Make Your Canopic Jar
Buy or make your play dough, or use modeling clay, or potters clay if you can get some.
Get a large empty yogurt cup – you're going to paper mache this for structure, and because the paper mache adds strength to the tub. In addition, it's easier to decorate dried paper mache, rather than the slipper surface of a yogurt tub.
Mix some flour with water in a tub and this together.
Tear strips of newspaper, or other soft paper, and dip them into your flour mixture. Completely cover the yogurt tub with layers of these damp strips.
Once it's covered from top to bottom, leave it in the sun to dry. Depending on the weather, this could take a couple of days.
Now you'll make the lid for your jar.
Take your modeling clay and play with it in your hands for a while to warm it up and make it easier to work with. If you find your modeling clay is too dry, dip your fingers in some water and rub it over the clay. Store any unused clay in an airtight bag to prevent it from drying out, especially air-dried clay.
Make your ball into a dome shape with a flat bottom. Choose which head shape you want to make and use any tools such as wooden sticks, spoons, or even your own craft tools. Most of this part is done simply by smoothing and pinching the features that you want eg. a nose, or ears.
To help you along, here are the four Sons of Horus – choose your favorite and get molding!
- Imsety (pronounced im-set-ee) stored the liver and this jar had a human head
- Qebehsenuef (pronounced kay-beh-sinoo-uf) kept the intestines and had a falcon head
- Hapy (pronounced hah-pee) stored the lungs and had a baboon head
- Duamatef (pronounced du-am-u-tef) had a jackal head and looked after the stomach
Allow this to dry.
When everything is completely dry, it's time to bring your jar to life with some color and paint!
Define lines with permanent markers, and use metallic bronzes and golds to give your jar some shimmer.
Decorate with hieroglyphics to tell the story of life in these ancient times.
Here are three websites with different angles on how they have made these as crafts themselves:
Mummify an Apple
This is a fun way to test science together with Ancient Egypt.
Take an apple and draw a face on it with a permanent marker.
Mix 40 grams of baking soda with 80 grams of table salt and put this into a container, such as a yogurt container.
Place the apple inside and completely cover it with the baking soda and salt.
If the apple is not covered, mix more baking soda with table salt at a ratio of 1:2.
Leave it for a week.
After seven days, pour the salt and baking soda out of the container and have a look at your ‘gorgeous' mummy apple!
Build Your Own Pyramid
Are you aware that the grandness of the pyramids can be seen from outer space? Khufu or The Great Pyramid is larger and stands out more distinctly than the other two. The Great Pyramid is also one of the seven wonders of the world and the most intact one.
Select a pyramid project or game from the list below and have a lot of fun (and it helps with maths skills and logical reasoning too):
- You could take the mud bricks (mentioned above) and try and build your own pyramid that way.
- Take Lego blocks and create the pyramids – or get yourself this amazing Great Pyramid of Giza Lego set that already has everything you need
- Have a fun paper cup pyramid challenge. Buy loads of paper cups and either see who can build the highest one in one minute, or how tall you can make it before it topples over.
- Get a whole lot of sugar cubes, and construct a pyramid out of these. You can take this one step further and bake a giant cookie that could be used as the base (desert) and use colored sugar crystals to create the Nile. Place your sugar cube pyramid on the sandy desert (biscuit).
- Practice math! Here are instructions for a two-player multiplication game with UNO cards:
Make an Egyptian Lunch
Doing all of these activities will keep you very busy, and while you're working like an Egyptian, and thinking like an Egyptian, you might as well be eating like an Egyptian!
A great idea and a wonderful learning experience is to have your children help you create snacks and make the lunch. It is all Mediterranean-style food so why not go out and buy the following, and then arrange them on a delicious-looking smorgasbord.
- Olives
- Dates
- Flatbreads
- Pita bread
- Peppadews with feta cheese
- Hummus
- Fruits
The great part about homeschooling is that you can teach your children how to turn chickpeas into hummus, or basil leaves into pesto! It's all about learning and having educational fun (and eating!) at the same time.
Write with the Hieroglyphic Alphabet
There are some wonderful printable activities here that your kids can use to learn about and practice how the Ancient Egyptians used to write! They'll be a great addition to your study (and they're free!).
Have Fun With These Ancient Egypt Activities for Kids!
The Ancient Egyptians were an interesting civilization, and even though modern Egypt is fast, and buzzing, and loud, and full of life (well, in Cairo it certainly is), these ancient times pop up all over the country, especially along the Nile River.
If you want to dive deeper and teach your children all about Ancient Egypt, I have a fantastic Ancient Egypt Unit Study for you with set lesson plans! It covers everything from the start of this fascinating ancient civilization, famous Egyptians, the pyramids, clothing and dress, of course, mummies, and so much more! This course has got you covered to learn about all aspects of life in this northern country in Africa.


This study of Ancient Egypt is sure to be the most popular one yet! I hope you enjoy these fun activities with your kids!
Related Posts
- Genially: An Easy and Creative Tool for Homeschool Projects
- Best Geography Apps Your Kids Won't Be Able to Put Down
- 12 History Apps That Will Get Your Kids Excited About Learning

Want some techie homeschooling tips and inspiration delivered to your inbox? Sign up here for weekly-ish emails from me.
Techie Homeschool Mom is a participant in the Amazon Services LLC Associates Program, an affiliate advertising program designed to provide a means for sites to earn advertising fees by advertising and linking to Amazon.com. You can read my full affiliate disclosure HERE.
About the Author
Just a geeky homeschooling mom inspiring digital learning and healthy tech habits for families.